Saturday, June 8, 2013

For You


Here is the MOJO296 card that I put together today.


 I was able to use the new products that I received in the mail late this morning. I was pleasantly surprised that after working with the Pistachio Pudding 131294 CS, that I like it. 

I wasn't fond of it when I first saw it, but after working with it today I have changed my mind. I love the way it coordinates so beautifully with the new Birthday Basics DSP 130145.


Stamps - Chalk Talk 130634, Mixed Bunch 125537

Inks- Pistachio Pudding 131177, Crisp Cantaloupe 131176

Circles #2 Originals 114526, Blossom 125603
1 3/4" Circle 119860, 1"Circle 119868

Square Lattice 119976, Perfect Polka Dots 117335

SNAIL Adhesive, Multipurpose Liquid Glue
Stampin' Dimensionals, 

Rhinestones Basic Jewels 119246

Thank you for stopping by today and I hope you have a blessed weekend.
Stay CRAFTY!

Bernadette


Thursday, June 6, 2013

TNT Thursday


Things have slowed down a little in the past few days with our move, so I was able to put together a TNT Tutorial this week.

This Crisscross Pocket card has been around for some time, but I believe this is the first time I have made one. They are usually made in the horizontal orientation, but this is vertical which is more pleasing to me.

{* My inspiration is from Linda over at stamping School.}


Cut your DSP 6"x12" and score in landscape position at 4" and 8". 
Turn and score at 5 1/2".
The finished outside card will be 4" x 5 1/2"


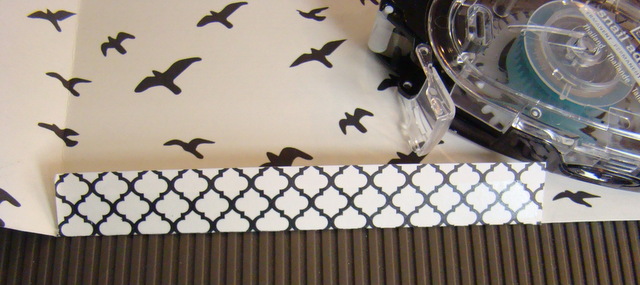
Cut the paper leaving at each end to the beginning of the middle fold leaving  the center 1/2" middle section in tact. (I used my cutter)

 The remaining piece should look like the photo below


Using your cutter, place your card stock on the platform and line up the top left corner of one section and the bottom corner in the channel to form a triangle, and cut. Do this with the remaining side.


This is the shape that you will have when have completed the cutting


I like to have all my pieces cut before I move ahead. I also stamped the images, cut the ribbon, embossed and used an edgelit on the black paper.


Now you can start folding and adhering the card base


 Run SNAIL along the center fold making sure that the you avoid gettingt  adhesive on the back of the card.


You will just need to run the SNAIL up part way on the opposite triangle 
and along the bottom. With the card facing you, fold the right 
hand side over and then the left side. Press to seal

**When you are scoring the DSP, make sure you use a light touch with the scoring tool. This type off paper is more fragile then the SU Card Stock.
 I'm telling you this from experience!

I rounded the top corners of the vertical fold card, tag and
 the layered tag piece.


Now you can start embellishing the outside and the tag.


I added the ribbon under the cut images and used the new Mosaic Punch to fill in two of the Mosaics on the embossed belly piece.The Medallion from the Happy Day stamp set was cut with my 1 3/4" Circle punch and layered with small medallion from the A Round Array and punched with the 7/8" Scallop.
 I added Stampin' Dimensionals to both medallions and
adhered them over the ribbon.


I stamped my sentiment and added two extra small medallions to the tag. My ribbon on top was just folded in half and adhered with Glue Dots and I added the punched piece to cover the ribbon ends.

I hope you have enjoyed this tutorial and will give this cute card a try!

I'm not sure how my time will be next week. We will be moving into our home, waiting for delivery of furniture, etc. and 
almost ALL my stamping supplies will be packed in boxes. 
I will be posting when I'm able to let you know what I'm up to.

Have a great weekend and stay CRAFTY!

BERNADETTE

Wednesday, June 5, 2013

Happy Day


Just a quick and card I made for my 5 year old grand daughter several days ago and just getting it posted today. I wanted to get it made and mailed out before all the "craziness" of moving took over.

She had called to tell me she was having a little sister in early Fall. She is so excited and thought she needed a card to let her know we were so happy for her and knew she would make a wonderful BIG sister.

SU! Products Used

Daffodil Delight 119683, Whisper White 100730, Pear Pizzazz 131201
 Gingham Garden DSP 129310

Happy Day stamp set 130297

Bloosm Punch 125603, 1 3/4" Scallop Circle 119854
Elegant Butterfly 127526, Bitty Butterfly 129406
Large Scallop Edgelits 127019

Pearl Basic Jewels 119247

SNAIL adhesive and Stampin' Dimensionals

 Thanks for stopping by

AND

 Make it a GREAT and CRAFTY day!

BERNADETTE

Tuesday, June 4, 2013

My RV Studio


I have been considering uploading pictures of my "studio" here in my RV for quite awhile. I decided it NEEDED to be done now since we will be moving into our new home this weekend and it will no longer be my space. 

 The photo above is our main eating area. I do keep it as you see it because it is our ONLY place to eat.The cabinets above are deep (only 2 of 3 shown) and really hold quite a few supplies. It's just a matter of remembering what's up there and what section of the cabinet they are in. 

A real challenge for me at times! :>}


Below and behind the table is more storage, but it is not as deep. I have utilized it to hold items that are not used that frequently.


This particular cabinet is to the left of my chair and houses my punches, Stamp Scrub,extra paper and some newer embellishments.


This teak stand not only holds crafting items, but  that top lifts to hold kitchen gadgets. I store my inks, Big Shot on the shelves. My embossing folders and dies are in the basket near the Big Shot.

On the floor is some of my paper storage, cutter and a container which holds my recent cards. Behind the stand and in back of the drivers seat, I have my Scoring Board, Diagonal Plate and Fiskar cutter.


This cart, which is located in the only clothes closet we have, holds various stamping supplies plus my 12x12 papers. I also have some chipboard and various tools stored under the bed and under a love seat in the salon area.


This cupboard, which is to the right of our couch, really came in handy and is just perfect for storing my stamp sets. It's not in close proximity to the table, but it works very well. 

I hope you enjoyed this tour of my RV Craft Studio. I will be uploading pictures of my new studio as I put it together in our new home. We are planning to to head out AZ on June 14th. with a shopping excursion to the IKEA store in Tempe while we are in Scottsdale for the weekend.

 I really need to sit down and put a list together before that or I'll come home with way too much that won't fit into the space I have!

Have a great week and stay CRAFTY!

BERNADETTE 


Saturday, June 1, 2013

Grab Your Greetings Promotion


      Grab Your Greetings Promotion      

                                             Sale                                       

   25 percent off three SU greeting sets!

 NO LIMITS
 
  Dates: May 31-June 30


Sale Price Retail Price Description Item
$17.96 $23.95 Sassy Salutations Wood-Mount Stamp Set 132070
$13.46 $17.95 Sassy Salutations Clear-Mount Stamp Set 126707

$14.96 $19.95 Sweet Essentials Wood-Mount Stamp Set 132085
$11.21 $14.95 Sweet Essentials Clear-Mount Stamp Set 126457

$21.71 $28.95 Petite Pairs Wood-Mount Stamp Set 128706
$15.71 $20.95 Petite Pairs Clear-Mount Stamp Set 122497


Friday, May 31, 2013

Gee, thanks


Here's a card today using the NEW Quatrafancy DSP which is available for order today! I hope you have your wish list ready. Just CLICK  here or on the  
Shop Now on the side bar, and this beautiful, bright paper can be yours. 

The sketch I used is an older CPS. I have been looking through my folder of sketches that I have had around for about 3 years getting inspiration. I felt this one fit perfectly with the paper and stamp set I used.

RECIPE

Quatrafancy DSP 130141, Whisper White 100730, Island Indigo 122923, 
Daffodil Delight 119683, Pumpkin Pie 105117

Island Indigo Ink Pad 126986

Really Good Greetings 130333, Mosaic Madness 130249 

7/8" Scallop Circle 129404, 1/2" Circle 119869
Adorning Accents Edgelits 125595

Rhinestone Basic Jewels 119246 
Baker's Twine-Whisper White 124262 

SNAIL Adhesive, Stampin' Dimensionals 

Have a great day and stay CRAFTY!

BERNADETTE


Thursday, May 30, 2013

Mission Accomplished

I just returned homed yesterday from my 8 day trip to North Carolina. Let's see how long it will take me to get over the "jet lag" from the East. I hope not too long. I still have lots to do to get ready to move into our new home.


Mission Accomplished Ramblings
I arrived into NC Tuesday evening (May 21), picked up my rental car and headed out to my daughter Lauren's  spending some time with her and her children that evening. Oh, I love those grand babies! I accomplished to have a good nights sleep since I had been awake since 2:45 AM that morning.

I had really dreaded the trip into Cary and to the Cube Smart facility, but headed out Wednesday morning with some hope and God's grace to get the job at least started.

I certainly didn't expect the reaction that I had when I opened up the door. I FROZE. My emotions just took over. Overwhelmed, I walked into a 10'x20'  storage unit that has been filled for over 3 1/2 years. Honestly, I  looked around and broke down in tears. Not only for the task that was ahead of me, sorting through boxes, unpacking and packing them, but memories that those boxes held and NO ROOM to even move around them. I had forgotten that all the furniture we had left was in front of almost ALL the boxes that were against the back wall!


My first look


I called my husband in California. Had my "mini breakdown", moved a few things, made some decisions how I would proceed and locked the door and left. I did some investigating on Consignment shops, called my son-in-law Matthew to see if he had a few minutes to run by and at least help me make a path and get some boxes down. That was accomplished several hours later. I went through the few boxes I was able to reach and called it a day for day 1.

 I am blessed to say, the remaining days went much better and letting go of "stuff" became easier. My wonderful children came by on Saturday to help me plow through stuff until my hubby came in late Saturday night. THANKS!!! You guys are the BEST children anyone could have.

 After working Sunday, Monday and part of Tuesday, we put the lock back on at 12:45 Tuesday afternoon with all our belongings that will be shipped to California and our new home, neatly packed and waiting for the moving company to pick up. I'm very thankful to the Lord and my family for helping  us get through this time and getting the job done.

A Moment of Reflection

As I was packing and sorting, I could not help but think of the families in Texas and Oklahoma and the devastation they have recently gone through. I felt guilty for having my "woe is me" attitude when they have lost so much. I'm thankful that the Lord reminded me of that and I quickly asked forgiveness for my "pity party" moments. I pray that they will be able to get their lives back to some normalcy and with joy soon.

Thanks for stopping by. I hope to have a card up tomorrow to get your creative juices flowing. Have a wonderful and CRAFTY day!

BERNADETTE

1000 Piece Puzzle

  It is a beautiful puzzle,but we probably will NOT do one again. The 500 pc. ones are much more relaxing. Heres hoping you all have a great...