Saturday, April 20, 2013

Congratulations with a Challenge


Today I am ending my week with a card I made for the Friday Mashup. This is my first time entering this challenge and believe me, it was a challenge. The color combination of  Sahara Sand, Perfect Plum & Wisteria Wonder was a little bit out of my comfort zone. I have never used this color combination together, but now I'll think about using it again. Thanks Friday Mashup team for pushing me out of my comfort zone!
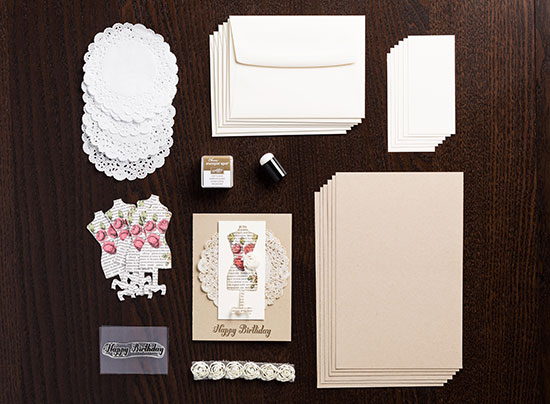
RECIPE

Paper: Sahara Sand 121043, Perfect Plum 101889 
 Wisteria Wonder 122922  Whisper White 100730

Stamp: Itty Bitty Banners 126257, Secret Garden 129144

 Ink: VersaMark 102283, White Stampin' Emboss Powder 109132

Tools: Vintage Wallpaper Folder 120175, Secret Garden Framelit Die 129372
Bitty Banners Framelits 129267, Finishing Touches Edgelits 127010
 
   Sweet Additons: Pearl Basic Jewels 119247

Big Shot, Heat Tool, Multipurpose Liquid Glue, Snail Adhesive


Thanks for stopping by and have a wonderful and CRAFTY weekend!

BERNADETTE
 

Friday, April 19, 2013

Paper Pumpkin and More


My Paper Pumpkin arrived today in the mail and I could hardly 
wait to open it and start crafting!

Here are the Kits contents


Everything you need to complete 4 cute cards.

Here is my completed card


A little cute and sassy.

 I decided to "step up" the card a little with
 some extra Stampin' Up! supplies.


I changed the orientation from a side fold to a top fold for my "stepped up" card. Also adding touches of More Mustard, Baja Breeze, and Old Olive. The "Seriously" stamp I decided to use solo stamping it with Baja Breeze ink.

Of course you could make all 4 cards the same and have a nice little set of cards, but why? It's always fun pushing your creative side to see what you
can come up using similar products.

If you got your Kit today, have fun with it. 
If you don't get the monthly kit, what are you waiting for? 
You to can get a creative escape each month delivered right to your doorstep.


 Click the picture below and it will take you to 
all the information you need to know to get your kit 
each month and please make sure your choose me as your demonstrator!


Thanks for stopping by. Have a great and CRAFTY day!

BERNADETTE


Thursday, April 18, 2013

T.N.T. Thursday


 This is the fun Gate Fold card I promised

The Interlocking Gate Fold


Lets get started

1.This card measures 4"X 5 1/2". The card stock will be cut 5 1/2" X 8"

2. Score the cut card at 2" and 6". Fold in the sides and use a bone folder to give you a nice crisp fold.
3. Now cut the outside panel pieces.
 Two at 1 3/4" x 5 1/4" and two at 1 1/2" x 5" 
I decided to line the inside of the card with the Midnight Muse measuring 3 3/4"x 5 1/4".
 This step is optional.


4. Layer all the pieces and center them
 on the side panels of the card base and 
adhere the solid CS on the inside.

5. Using the Ovals Collection Framelits, choose the first 3 inner sizes.  


6.With the largest of the 3, cut one from the Midnight Muse, the second largest from Summer Starfruit, and the smallest from Whisper White for your sentiment.  I also embossed the middle piece with the Argyle Folder. Which is optional.


7. The picture below shows how remove 
the center of the large oval to be used 
as part of your interlocking piece. I placed the larger oval on the CS, cutting side down, layered the next size on top, making sure to have the edges even all the way around. I placed a sticky note on the pieces to hold everything in place while I ran it 
through my Big Shot.


8. Stamp your sentiment on the Whisper White. I used one from the One in a Million set, and adhere it to the middle oval CS. Center this on the front of your card making sure that the glued edge is
 only the left hand panel.


9.Take the large oval and place a small amount liquid glue on the right edge. (see picture below) Place that onto the right panel gently pulling the sentiment  through before adhering it to the right panel. 

*You will want to make sure that 
the pieces are nested and
 lined up before gluing it down


 I finished the outside of the card using punched 1/2"circles and the flower from the Itty Bitty Shapes Punch pack and placed rhinestones in the centers of the flowers for a little "bling" appeal.


Inside of finished card

Well that's it. I hope you have enjoyed my mini series on Gate Fold cards and will give them a try. If you have any questions please don't hesitate to contact me here on my blog.

 Have a wonderful day and as always,stay CRAFTY!

BERNADETTE

The inspiration for this card came from Linda Heller over at Stamping School

Wednesday, April 17, 2013

Dolled Up Birthday

Isn't it just darling? If you want to have a sweet birthday card stash, this Kit is for you. 
If you know someone who would love to make cards, 
but doesn't have the supplies, this would be a great gift for them.

AND if you own the framelits, you won’t be limited to 6 cards ever!  AND you can make 3 varieties with the framelits!

You can click on the left side bar and download a Spring Catalog.

The Dress Up Framelits are seen on page 32.


Stampin' Up! has just introduced it's new Project kit

Dolled-Up Birthday


The Dolled-Up Birthday kit includes the following:
  • Dolled-Up Birthday Photopolymer Stamp (1)
  • 8-1/2" x 5-1/2" Crumb Cake Cardstock (6 pieces)
  • 2" x 4-1/4" Very Vanilla Cardstock (6 pieces)
  • Very Vanilla Medium Envelopes (6)
  • Tea Lace Paper Doilies (6)
  • Dress Up die-cuts (6)
  • Soft Suede Classic Stampin' Spot (1)
  • Vanilla 5/8" Flower Trim (6 pieces)
  • Sponge Dauber (1)
Get everything you need to make six cards for only $15.95 (item 133913)!*

To assemble one card, follow the instructions below:
  1. Place the stamp on clear-mount block D or H rubber side up and ink with the Soft Suede Classic Stampin' Spot.
  2. Stamp "Happy Birthday" at the bottom of the card front.
  3. Ink the Sponge Dauber with Soft Suede ink and gently antique the doily and the edges of the dress form.
  4. Adhere the pieces to the card front in this order:
    • Doily
    • Very Vanilla Cardstock
    • Dress form
    • Flower

*Adhesive not included

Just click on the photo above and it will take you directly to my business site where you can order or you can contact me directly by email at: bernadettebliss@gmail.com

**Order three or more and I will send you**
 a "sweet" surprise in the mail. 

Have fun shopping, and have a wonderful and CRAFTY day!

BERNADETTE

Simply Mused


With a touch of Gumball Green. I have been looking through my sketch files 
the past couple ofdays and came across this layout from 2011 by Lisa Spangler. She had used a beautiful, soft Paisleyprint which I loved. The only paisley I had was the darker one from the Poetic Poetry DSP.Although I had tried Primrose Petals and Summer Starfruit as the accent color, Gumball Green won out! It's such fresh and trendy looking color.

I like the combination and I have used that green very little since I bought it. Another one of those items that needed some crafting "love". Lisa did not add the triangles, but I just felt it needed something extra, so I used them at an angle for some interest. This is certainly a card that can be massed produced because of its simplicity.  I'm have been thinking of several other papers,color combinations, and sentiments that would work well. 
How about you?


RECIPE


Paper: Crumb Cake CS 120953, Gumball Green CS 126840
Midnight Muse CS 126843, Print Poetry DSP 129312

Stamp: One in a Million 126382

Ink: Midnight Muse 126860

3/16" Corner 119871, Square Punches, 3/8" Stitched Satin Ribbon (Gumball)

Stampin' Dimensionals, Glue Dots, Multipurpose Liquid Glue


Tuesday, April 16, 2013

Twirly- Whirly Birthday


This is my entry for the MOJO289 challenge. When I saw this sketch I knew I wanted to use the little Pinwheel die. I have only used that one other time 
and it needed some "love".

RECIPE

Paper: Crumb Cake CS 120953   Island Indigo CS  122923 
Whisper White CS 100730, Sycamore Street DSP (SAB item)
World Spectacular DSP 126897

Stamp: Wishes Your Way 129156

Ink: Island Indigo 126986

Sweet Additions: 2-3/8" Scallop Circle 118974, 1-3/4" Circle  119850
Pinwheel Die 129411, Whisper White Baker's Twine 124262
Perfect Polka Dots Folder 117335, 1/4" Island Indigo Ribbon (SAB item)

Mini Glue Dots ,Stampin'Dimensionals, Multipurpose Liquid Glue

Well that's about it.  I hope  you have a great and CRAFTY day!

Monday, April 15, 2013

Yeah New Wood-Mount Cases

Now this is a great redo for the new Stampin'Up! year.

 The old boxes to store the wood mount stamps were difficult to store. All different sizes, hard to read what stamps were in what container, etc.
 It looks like with these new boxes that has all been rectified.
Can I say I'm a happy camper!

Introducing our new wood-mount stamp set packaging! These new cases are similar to our clear-mount boxes and fit perfectly on the shelf right next to them. They also have the images and stamp set name on the spine to make your search for the right set even easier.
Starting May 31 all wood-mount sets will come in this new packaging (sneak peek sets will also be in the new boxes during the preorder). And empty cases will be available with the launch of the new catalog. That means you can transfer all your old sets to these new boxes! There will even be a template for you to create your own label for your old stamp sets (available May 31).
 A pack of four half-size cases (3-3/4" x 5-1/2") will sell for $4.95 and a pack of four full-size cases (7-1/2" x 5-1/2") will be $6.95.
Get ready for all the exciting new products in the catalog--especially the new wood-mount boxes!


Just click here to find out why I'm 
excited about this new product change

What, no cards!


I can't believe I haven't posted a card or anything on my blog since Friday. No, I haven't lost my mojo, I just had some out of state company.


My hubby and daughter Danielle in La Jolla,CA


 I loved having my daughter and her husband here and seeing friends from AZ. Living in California and having friends in AZ and 6 of my 7 children on the East Coast, and having them take time to visit is a blessing.


 Bob and Raymond

Today is MOJO Mondays challenge and I hope to get to that soon.
 It always seems to push me creatively. Yesterday I was looking 
over some older Page Sketches that I would love to try this week.
I don't know about you, but when I see a sketch
 I really like, my creative "wheels" really start turning.

To finish out the week, I'll be working on my T.N.T. Thursday tutorial. 
This week will be my last week showcasing the Gate Fold card.
The card for this week is really an interesting design.
So make sure to stop by on Thursday.

Make your Monday great and stay CRAFTY!

BERNADETTE


1000 Piece Puzzle

  It is a beautiful puzzle,but we probably will NOT do one again. The 500 pc. ones are much more relaxing. Heres hoping you all have a great...